

Even if drywall was installed perfectly, daily wear and tear will create small holes. Fortunately, the tools to fix these problems are relatively inexpensive and well within the abilities of most homeowners.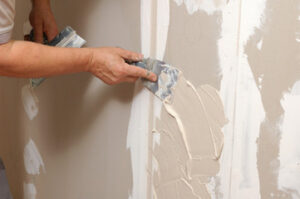
Small holes from nails, screws, and picture hangers can be patched by applying spackle or joint compound to the hole and sanding it smooth. Use a dust mask when working with drywall compound to avoid inhaling the fine particles. Contact Drywall Repair Las Vegas for professional help.
Small holes in drywall are the easiest to fix and can usually be done with spackle or joint compound, a putty knife, and a sanding block. If the hole is large, you’ll need to purchase a drywall patch and possibly some mesh tape to make a stronger repair.
First, lightly sand the surface in a 1- to 2-foot area around the hole with a sanding block or power sander to make it even and smooth. Then wipe down the area with a damp cloth to remove any dust and residue. Next, cut strips of drywall joint tape and apply them to the borders of the damaged area. Be sure to overlap the tape strips at the corners.
Once the tape is in place, fill the damaged area with drywall compound and spread it with your putty knife until it is even with the rest of the wall. When the first coat is dry, sand it with fine sandpaper until it is smooth and ready for a second coat of drywall compound. If you need more than two coats, sand in between each one with 100–120 grit sandpaper to ensure that the patch is smooth and blends into the existing wall.
For larger holes, it is important to use a mesh patch so that the drywall mud bonds well and doesn’t shift as it dries. This will prevent the patch from becoming lumpy and visible under a coat of paint.
If you must enlarge a hole, be sure to check behind it for utilities such as electrical and plumbing lines before cutting. Homebuilders and renovators often forget to mark the location of these lines before they cut into walls, making them difficult to locate later.
If you have a large hole, cut a piece of new drywall that is a few inches bigger than the hole. Secure the edges of the patch to the furring strips with drywall screws, and then screw through the back of the drywall into each wood lath, making sure to align the holes in the top and bottom of the wall.
Cracks
Drywall is a popular choice for home construction because it’s relatively inexpensive and provides a great finishing touch to any room. It’s important to take proper care of drywall in order to avoid damages and ensure it’s long-lasting. When damage does occur, however, it’s critical to hire a professional to perform a prompt drywall repair.
Holes, dents, and cracks are all common drywall issues that can affect the appearance of your home. The best way to handle each type of problem will vary depending on its severity. For instance, small holes can be repaired with a patch kit, spackle or joint compound (aka drywall mud), a putty knife, and a sanding block. Larger holes may require reinforcing mesh prior to spackling.
Most drywall cracks are caused by normal building movement, settlement, framing shrinkage, or moisture. During construction, drywall is nailed to the wall studs and ceiling joists with drywall screws, and these fasteners can loosen over time. This loosening is most likely caused by a combination of factors, including uneven building movement, changes in temperature, excessive moisture, and inadequate nailing.
These forces can lead to a wide range of problems, from hairline cracks to horizontal and diagonal wall cracks. If the cracks are large enough, they can compromise the structural integrity of the drywall.
Depending on the location and severity of the crack, it may be necessary to replace entire sections of the wall. Fortunately, this is rarely required.
While a crack in a corner bead is less common, it can occur from run-ins with the vacuum cleaner or even kids flinging their toys. Typically, only a section of the corner bead is damaged, and it’s fairly simple to fix.
Start by removing any loose bits of drywall from the affected area. If the crack is in the corner, carefully widen the crack with a utility knife to determine if the crack extends through the corner bead or if the tape is pulling loose from the surrounding drywall surface. If the crack extends through the corner bead, use aviation snips to cut off the severed section of the bead and pry it away from the wall surface.
Damaged Beads
When two pieces of drywall meet at an outside wall corner, they’re protected by a metal L-shaped strip called a “corner bead.” Depending on the severity of the damage, it may be necessary to remove and replace the damaged bead.
When a corner bead is damaged, it can expose a joint to moisture, which could lead to severe mold and structural problems. Mold growth and mildew often indicate that there is a leak in the home that needs to be fixed.
Typically, the only way to repair a damaged corner bead is to remove and replace it. A drywall professional can recommend the best option to eliminate the leak and prevent future mold growth.
The problem is most likely caused by water that is seeping under the drywall and condensing on the inside of the wall surface. If this occurs, it’s important to contact a professional immediately to prevent further damage and moisture from penetrating other areas of the house.
A sagging ceiling or wall, wet drywall, and cracks that are wider than 1/8″ should all be investigated for moisture sources that need to be addressed. It’s important not to attempt to paper over these more significant cracks or sags because it will only lead to further problems.
In most cases, these more serious cracks and sagging are caused by water or a roof leak. Unless the source of the problem is identified and corrected, the drywall will continue to deteriorate.
Use a stud finder to locate the studs closest to either side of the damaged area. Then use a carpenter’s square to mark the area for cutting. The marked area should extend at least an inch past the center of the nearest stud on both sides.
It’s helpful to spritz the edge of the new corner bead with water before sticking it to the wall. This will help create a stronger bond and cut down on wrinkles.
Apply a layer of low-dust pre-mix drywall joint compound to both sides of the bead, using a joint knife to smooth out any ridges. Allow the joint compound to dry according to the manufacturer’s instructions before sanding the area.
Mold
Drywall is a popular wall building material for homes because it’s cheaper than wood or concrete walls and has a nice finish. However, it’s softer than either of those materials, making it more prone to damage. While it is possible to fix drywall in your own home, a professional may be needed if major damage occurs or if you have an infestation of mold or mildew.
Mold and mildew are not only unsightly but can pose a health hazard, and if left unchecked, they can destroy the structure of a building. While some types of mold can be cleaned with soap and water, others require professional remediation. Molds feed on organic material, such as cellulose, which is found in plants and other living things. They produce enzymes that degrade dead organisms, and in the process, they can also rot drywall and cause structural problems.
A homeowner can usually tell if there is a problem with mold or mildew because of the musty smell that develops in moist environments. If you suspect you have a problem, a good place to start is to look for mold under carpeting, in ductwork, and behind drywall. You should also check your ceiling for discoloration and bubbling paint, which are signs of excessive moisture.
The most common way a homeowner can fix mildew or mold in drywall is to scrape the affected area clean, then sand it smooth. Afterward, you can apply a coat of primer and paint, allowing the surface to dry completely. While you can buy premixed drywall compounds, it’s often more cost-effective to make your own patching material. To do so, add one part of the pre-mixed compound to two parts of sanding powder until it’s thick enough to apply with a putty knife.
For smaller holes or dents, you can use a spackle knife to fill them. Using spackle will give you a more seamless finish than simply painting over the hole. For this, you should use a putty knife that’s specifically designed for repairing drywall, rather than the type of narrow utility blade you would use for wood putty.